Swapping the Alternator & Battery Supply Cables
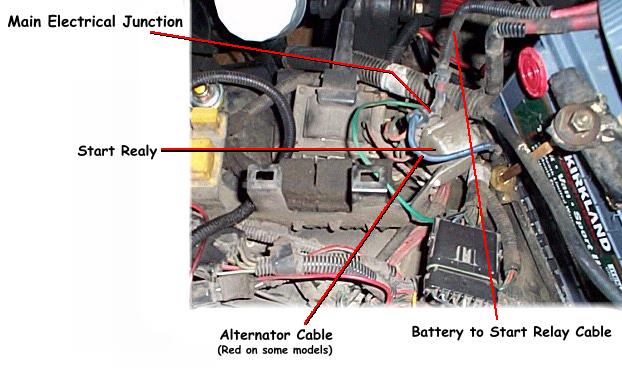
The first thing you need to do is disconnect the battery, since all the connections you will be dealing with are HOT all the time and are un-fused.The alternator charging wire originates at the alternator's output (the large stud on the back of the unit), and runs up through a loom to the what is called the Start Relay (not to be confused with the Starter Solenoid) on early on late 80s and early '90s models ¹(for late models see note at the end). The Start Relay is located directly behind the battery, under the large black cover that protects the Relay Center (see photo below). It is the front most relay, the largest one in the group, and it has a metal case. It has several push on connectors, and one large stud with the battery cable (red), alternator wire (red or blue), and several green and orange wires (depending on your options), attached to it. This stud is the main junction between the battery, alternator, and the electrical system, ...all power distribution to the vehicle (except the starter) comes from this point. Remove the nut, and remove the existing alternator wire (blue or red), and the red battery supply wire. Feed one end of your new alternator cable (the long one) down through the engine compartment toward the alternator, and attach the upper end to the stud of the Start Relay, along with the new battery supply cable (short one), replace the nut and tighten securely.
Now crawl under the vehicle and remove the nut and wire from the back of the alternator, and attach the other end of your new alternator cable, and tighten the nut securely. You may remove the old alternator wire if you want, ...I just taped the ends of the old wire and left it in the loom since removing it looked to be a hassle, and it doesn't hurt anything to leave it. You can also "piggy back" the new cable on over the old one if the stud on your alternator is long enough. However if choose to do this, be sure you "piggy back" both ends, do not leave one end unhooked. Now you can place a couple of wire tie-raps to secure the new cable to the old loom, and make sure the new cable won't (can't) be rubbing on any hard surfaces anywhere.
Now back on top, you can route the other end of the short supply cable to the battery connector, and attach it under the clamping nut. Double check all your connections, then re-attach the battery, and your done!
¹ LATER MODELS:
There is no Start Relay on the later models, instead the main junction is on the front of the Power Distribution (PDC), located behind the battery. The Junction itself is a threaded stud that is protected by a small black plastic cover that snaps off to gain access. On these models, it is easier to attach the new alternator cable over the top of the old one at the alternator end, leaving the original wire in place. This may be a problem on some alternators if the stud is not long enough to hold both cable connectors and still have room for the nut, if this is the case, then you will have to remove the alternator end of the factory wire and remove fuse #F8 (labeled "60A ACT PWR2") and fuse #16 (labeled "60A ALT PWR1"). This will effectively disconnect both ends of the wire and it can be taped up out of the way. The other end of the new alternator cable can be attached directly to the the junction on the front of the PDC, this stud is plenty long enough ta accept the additional cable.The battery supply cable is easier to replace. However if you still have the original molded one-piece battery connector at the battery, you can attach the new cable to the clamping nut & bolt of the connector, and piggy-back the other end at the junction on the PDC.
Back

A Wizard of Wiring
Production
WoW
®