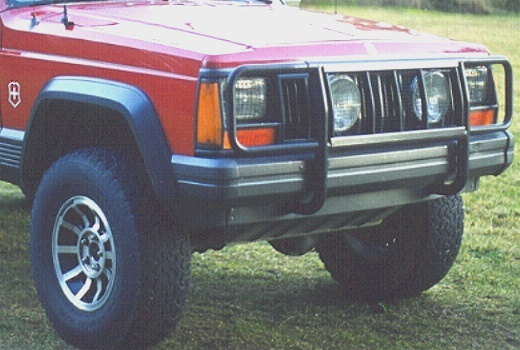
This is a nice improvement to make, and it is virtually unnoticeable. It does not interfere with approach angle, and it protects the tie rods, and keeps branches, and poles from getting jammed up over the front axle (a real problem here in the Northwest). I have smacked a hidden stump with it pretty hard, and it did not phased it at all. I'm glad the skidplate found the stump instead of the tie rod.As you can see, even with a 5" lift, it's still down there where it can do some good. On a stock height XJ, the plate is much lower than it needs to be to protect the steering components, so lifting 2"~3" still won't expose very much. So at 5 inches of lift, getting 1¼" of protection back, puts you back in the ball game.
In addition to the usual tools for removing the
front skidplate, you will need the following tools:
A hack saw (with a good blade)
An electric drill with a 3/8" bit,
1/8" bit for pilot holes,
a center punch,
and access to a vise to hold the spacers while you cut them to length and drill the holes.
Also a round file or a rat tail file could be very helpful during the final fitting.
The rear spacers will be made from 1¼ square thick-wall tubing. For the front spacers you have a choice (maybe).
The first step before you remove the plate, will be to measure the amount of exposed thread left on the three front skidplate mounting studs that are located along the front edge of the plate. This will determine the thickness of the front spacer. I had ¾" of exposed thread left with the nuts in place, so I used a ¾" x 1½" piece of steel bar stock 24" long for the front spacer. The width is not important, you can use 1" or 1¼" if that's what's available. You might need to use a 5/8" bar if you don't have enough thread on these studs. If you have ½ " or less, you will have to remove the studs, and use bolts instead. If you do this, you will be able to use the same 1¼" square tubing for the front spacer, instead of the thinner bar. The front spacer does not have to be as thick as the rear spacers, since it is the rear spacers that determine the actual drop of the plate, and the amount of protection it will provide. However the front should drop as much as is convent, in order to maintain a good contact between the plate's rear flange, the spacers, and the mounting surface of the *frame. If you don't lower the front, you will create too great of an angle at the rear mounting flange, to get a good secure installation. Never use washers for skidplate spacers. They do not provide enough surface contact to withstand the forces of impact that a skidplate is subject to.
After you determine what you need for a front spacer, you'll need to go shopping.
You will need:
1 foot of 1¼" square thick-wall tubing (1/8"+), for the rear spacers.
4 (ea) 10mm Grade 8 bolts, 50mm long (2") 1.50mm pitch, for the rear fasteners.
24" of 1½" x ¾" steel bar stock, for the front spacer. (or 1"~1¼" x ¾)
{Or if you're replacing the front studs, an additional 24" of 1¼ square tubing,
and 3 (ea) 8mm x 50mm x 1.25 pitch bolts}NOTE: My '88 factory skidplate, is held in place by three studs along the front edge, three bolts at the rear of the passenger side, and one bolt at the rear of the driver's side. YMMV, and have three bolts on the rear driver's side also... if so, add 2 more 10mm bolts, and cut one more 3" piece of tubing for the second long spacer.
Now you are ready to remove the skidplate (if you have not had this off before, use caution, as it is fairly heavy, and the last thing you want is this hunk of steel falling in your face). I find it easier to remove all but one of the front nuts first, which I leave threaded on a turn or two, then remove the rear bolts, then remove the last front nut.
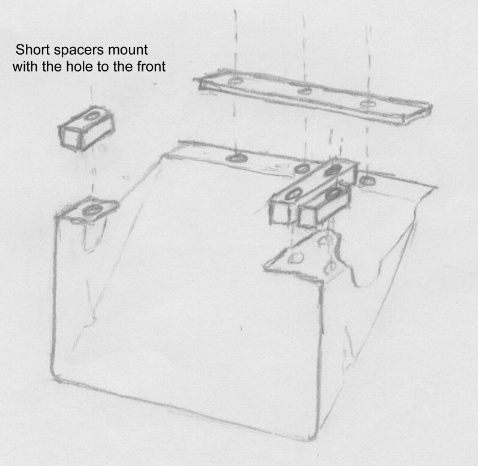
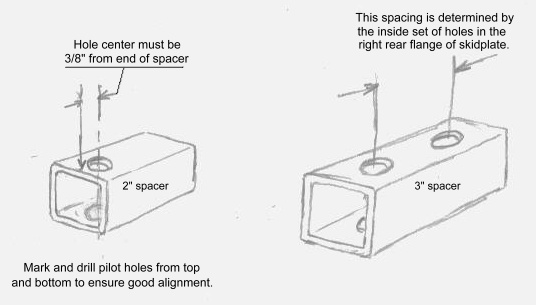
From the 1¼ tube you will need to cut two pieces 2" long, and one piece 3" long. Mark & center punch each 2" piece, top and bottom, 3/8" in from one end and centered side to side, and drill a 1/8" pilot hole in from the top and the bottom, then drill a 3/8" hole all the way through. It is important that this measurement be as close as possible, because these spacers need to clear the anti-swaybar mount, and there is not much of room for error. This will put the hole about 3/16" from the end of the spacers, which is the same distance from the edge the hole in the skidplate flange has.
Next take the 3" piece of tube, and align it with the rear flange of the plate to mark the two inside holes, punch , pilot, and drill two 3/8" holes all the way through.
Please excuse the rough sketches, it was quicker than taking a photo, and waiting for the processing.Now take the front spacer, and align it flush to the leading edge of the plate and mark the front holes, punch , pilot, and drill the 3/8" holes to correspond with holes in the plate for the studs. These holes are larger than necessary, but gives you some leeway for alignment.
This completes the fabrication process, and all that's left is to bolt it all in place with the spacers. I found that using duct tape to hold the spacers in place, will help facilitate reassembly. If you have a welder, or know a friend with one, you can tack the spacers in place, which will make removal in the future a breeze. I took mine to a welder after I had it all assembled, and had him tack the spacers to the plate, while it was mounted. (no... not welded to the vehicle).
The diagram shows the proper placement of the spacer blocks for drilling alignment and assembly.
If you wanted to omit the 3" spacer, I think it would still be very strong, when you examine the right side flange, the two inside holes aren't in a very effictive position, and appear to add little to the overall strength of the assembly.
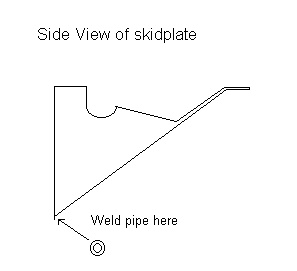
If you have a 5+" lift, and want to get another inch of protection, you can have a 31" piece of 1¼" sch40 round pipe welded to the lower rear lip of the skidplate, which will also strengthen the plate significantly.
If this looks like more fabricating than you care to deal with, print this page and take it, along with your skidplate to your favorite machine shop, and they'll be able to fix you right up. (just don't tell them who drew these very rough sketches! };)
If you have any questions regarding this page,
feel free to e-mail me at
dch@olypen.com